This will be my first official blog post . I had to get this out there to help someone who has spent days trying to figure out how to host a simple flask python app.
I literally spent 5 days trying to figure out how to host my flask app on pythonanywhere.com.
I will like to say a big thanks to Glenn, PrettyPrinted YouTube video and the pythonanywhere.com forum for the help.
In the following steps, I will walk you through hosting your python app. I hope this saves you days of trouble and wondering whether you made a mistake by choosing pythonanywhere.com because you did not.
NB: This is for developers who have already designed their app and database on their local machine and looking to push it online.
STEP ONE: (Signup and setup a repository).
Sign up on pythonanywhere.com using a paid plain for about $12/month so you can get access to Postgres Database
On your local machine, setup version control such as git or mercurial. I use mercurial for version control.
Setup a repository on Github or Bitbucket and push your app to the repository of your choice. I use Bitbucket as my repository.
STEP TWO: (Clone your repository)
On your CONSOLE TAB on pythonanywhere.com , select Bash. Bash on pythonanywhere.com comes with mercurial and git (hg and git) pre-installed. So you can feel free to clone your repository in your preferred directory on pythonanywhere.com
With the above done, you have your app now available on pythonanywhere.com
STEP THREE: (Create your virtual Environment)
On your Bash Console, type the following command to create a virtual environment called “powervisionvenv” –> mkvirtualenv –python/usr/bin/python2.7 powervisionvenv
The command above creates a virtual environment called powervisionvenv, this virtual environment can be accessed by clicking on the FILES TAB then clicking on the .virtualenvs
The newly created virtual environment will appear. (NB: Please do not use the virtual environment from your local machine on pythonanywhere.com)
From your newly created virtual environment, you can use pip to install all the necessary packages your app requires. Eg: pip install flask, to get flask up and running.
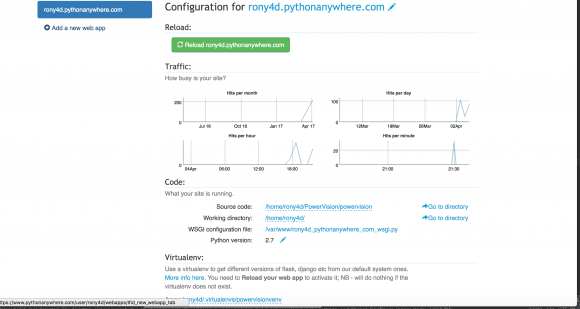
STEP FOUR: (Configuring your web app)
Click on the Web Tab and select Manual Configuration.
Select a python version that corresponds to the python version used in creating your virtual environment. In this case python 2.7.
Under virtualenv header, you need to add the path to your virtual environment. By typing the name of the virtual environment and hitting enter(windows) or return(mac), the virtual environment will automatically be added.
Under Code header, click on the WSGI(Web Sever Gateway Interface) Link. This is the file that contains the code that enables you configure the entry point of your application. The source code is the path of the directory containing your main python file. In my example it is py see figure 1.0 below.
Comment or delete the default “Hello world” code from line 19 to about line 48.(NB: this line numbers might change in the future)
Uncomment the area of your choice based on the framework you are using. In my case I uncommented the lines under the flask application. It will look like the figure 2.0 below:
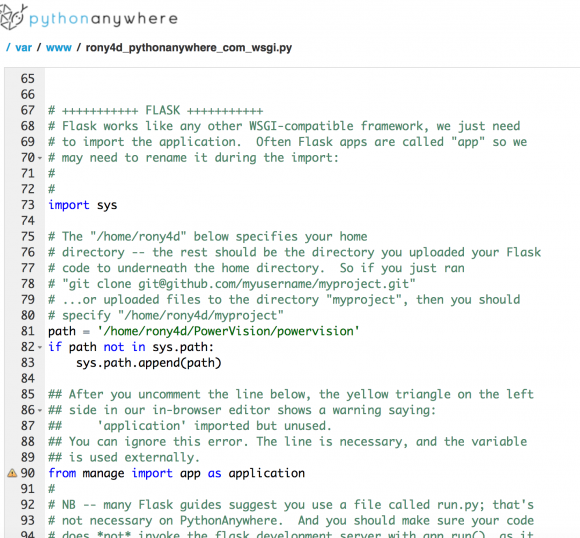
Ignore the warning sign and save the file
Click on the Web Tab and click on reload. In my own example it is pythonanywhere.com
Visit your web page(pythonanywhere.com) and view your app running
STEP FIVE: (Configure your database)
On your local machine, backup your current postgres database.
Click on the Files Tab and create a directory to hold your database backups.
Upload the database backup file using the Upload File button
Click on the Databases Tab and Select the Database of your choice. In my example. I am using Postgres.
Configure the database by setting a new password
An address, a port and a Superuser role name will be assigned see figure below
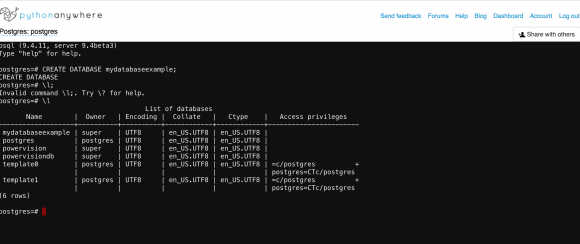
Click on the Consoles Tab and click on postgres. A postgres console will pop up.
Create a database with the name of your choice, preferably, the name of the database you backed up from your local machine. Use the following command to create a database->CREATE DATABASE databasename; See figure 3.0 below

You can view databases you have created by entering the command-> \l This lists the databases you have created. See figure 4.0 below
To restore your database backup to the newly created database use the following command. /usr/bin/pg_restore –host “rony4d-410.postgres.pythonanywhere-services.com” –port “10410” –username “super” –no-password –dbname “powervision” –verbose “/home/rony4d/PostgresDbs/powervision.backup”; ->See figure 5.0 below

References:
Deploying Flask Apps Using Python Anywhere by Pretty Printed
Python Anywhere Forums
I hope you find this really helpful. Thanks a lot and keep expecting more from ugarsoft’s blog.

